
Viewing measurements with mobile devices
To view the measurements (made with the instrument) using mobile devices, you need to set up/create your account (as described in the instructions available in the START area).

If you want to make test measurements, e.g. by pressing the head of the instrument with your hand, or making random measurements on a door, it is advisable to carry out the "Test Measurement and Visualisation" procedure, which allows you to evaluate measurements on mobile devices in a simple and quick way.
 If a complete test is to be carried out on a door, it is necessary to know the points predefined by the standards and described in the Quick Handbook. You can then associate the measuring points in two ways: on site (Association during measurements) or in the office (Association after making measurements).
Making a complete test on a door
Test Measurement and Visualisation on Smartphone
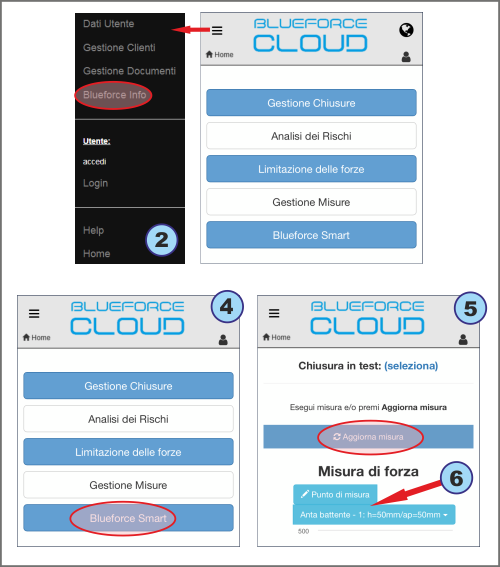
1) Use your smartphone to access the Cloud area with the log-in information obtained after user registration (see page 5).
2) Check that the serial number of your instrument is set correctly in the BlueForce Info menu.
3) Turn on the instrument and make a Test Measurement (see page 5).
4) On your smartphone press on BlueForce Smart.
5) Then press Update Measurement to display the parameters and graph.
6) To evaluate the measurement according to the standards, it is possible to select the measuring point and the type of door.
Making a complete test on a door
The verification of the force limitation of a door can be carried out in two ways:
Association during measurements
N.B. Please note that the association during the making of the measurements allows mainly the use of mobile devices in the workplace.Association after making measurements
Association during measurements
Log in to the BlueForce Cloud area and select the Blueforce Smart function (as described above).
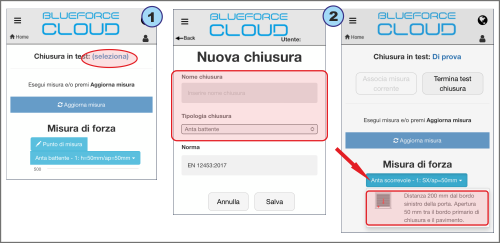
(1) Choose the door where you want to carry out the new measurements session by pressing on select (Currently testing door), then select a door from those available (previously saved) or create a new one.
(2) Below, if you have chosen to create a new door, you will be prompted to enter the Name and Type of door (see example on the left). If, on the other hand, you have chosen to use an existing door, you must click on the Type of door, then click on the detail box and then select the Measurement point (see example on the right).
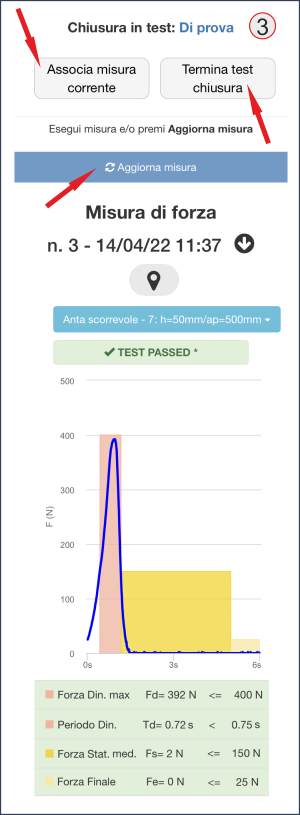
(3) You can now make the measurement with the instrument at the chosen point, then press Update to display it.
Associate the measurement by pressing on Associate current measurement, (a confirmation notice will be displayed).
To end the test session on the door, continue to make measurements with the instrument and then associate them by repeating the above operation: Update -> Select measurement point -> Associate current measurement.
At the end of the session, press Finish Test (the list of measurements will be displayed).
Then you can create the test file (final measurements report saved in the cloud portal), or you can delete the measurements individually or all together by pressing on Empty measurements list.
N.B. When performing the above operations, the measurement graph is always displayed, scrolling down it is possible to view the details of the measurement, such as: the progressive number, the date, the time, the instrument orientation, the GPS position, the test result, the parameters and finally the calibration date.
Association after execution of measurements
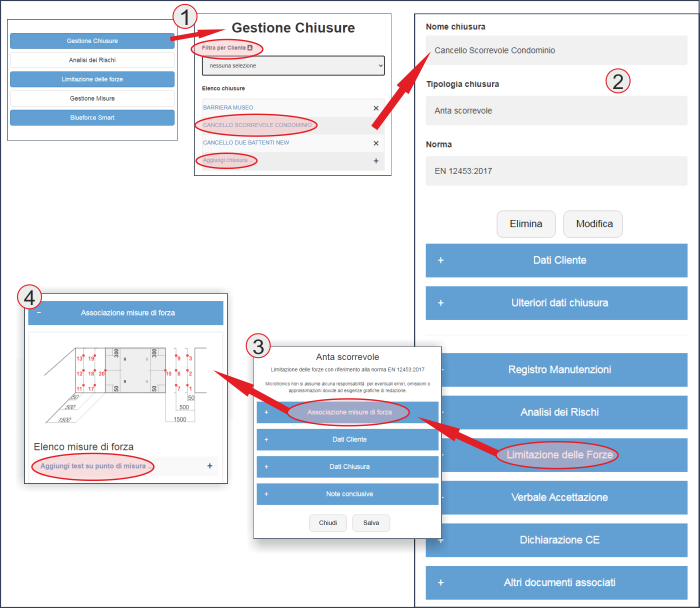
This procedure allows you to associate the measurements saved in the Cloud area to a Door/Customer, at a later time after execution. (The following graphical representation shows the use with a PC, however, the operation can also be done with mobile devices).
(1) From the Home page, select Doors Management. Doors management contains all the saved doors (it is possible to filter only for doors associated with a customer from the Filter by Customer menu). If there are no doors available, you can create a new one by selecting Add Door.
(2) By selecting an available door (e.g. sliding gate) you access the section dedicated to the Technical File, where you can create the documents required for the Conformity of automatic doors, e.g.: Maintenance Log, Risk Analysis, Forces Limitation, EC Declaration, etc.
(3) Then select Forces Limitation to access the next menu (which also allows you to check/add/edit data of the Customer and of the Door).
(4) Next, select Force Measurements Association to access the page describing the door (with graphical representation and reference points). Select Add test on a measurement point to start associating measurements.

The pictures show all the measurement points required by the reference Standards. In view of the many variants of automatic doors, it is not always possible to carry out all the measurements required by the Standards. Therefore only the actual measurements available in the Cloud area should be associated.
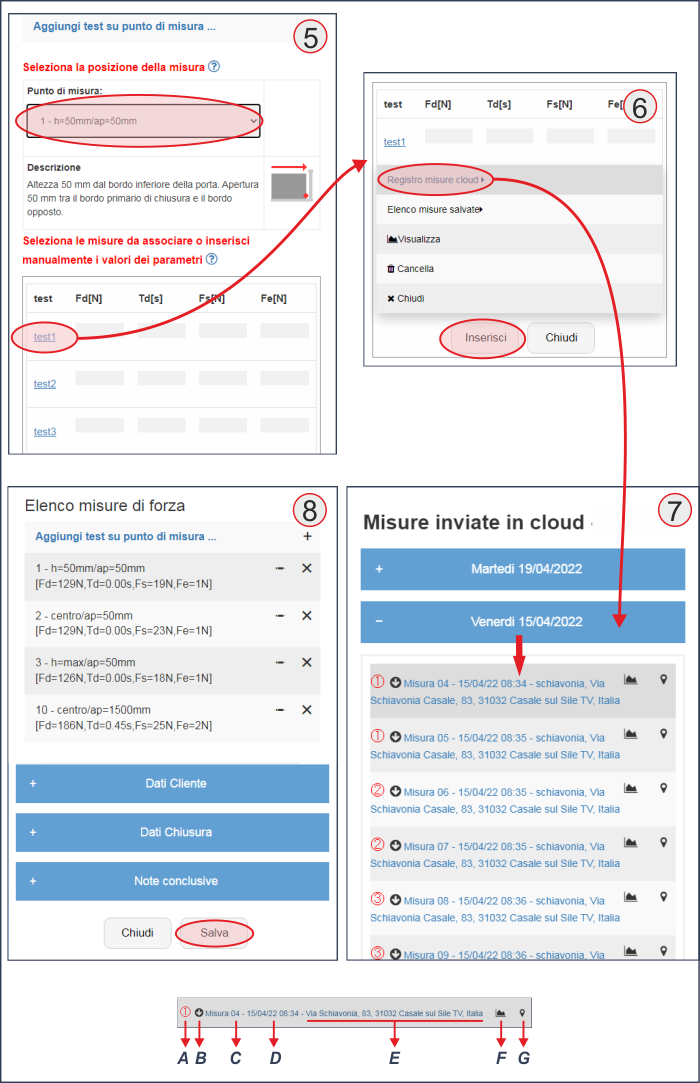
(5) Then select one of the points available in the Measurement Point drop-down menu (the detailed Description provided for by the Standard is available under the menu), then proceed to select the test, e.g. no. 1.
N.B. Please note that normally three tests/measurements are provided for each point with the calculation of the resulting average value.
(6) Later on you will access the menu that allows you to choose the measurements stored in the Cloud, then select Cloud Measurements Register, to access the list of Measurements (sent by the instrument in GSM mode).
N.B. This menu also allows you to view/edit/delete the associated measurements.
(7) The list of measurements is represented by a calendar, each measurement taken is saved on the day of execution. Select a measurement to associate it with the previously selected point and press Add.
In the details of the measurement we can identify:
A - Position number corresponding to the Quick Handbook supplied with the instrument (point function).
B - Arrow indicating the physical position of the instrument: horizontal, right and left.
C - Progressive reference number of the measurement saved in the instrument.
D - Date and time of the measurement
E - Geographic address identified by the GPS system.
F - Preview of the measurement (graph and parameters).
G - GPS position (opens the browser on Google Maps).
(8) Repeat the association operation described above for each measurement point, when finished, click Save to save the complete Test Report.
You can then Print the Report, see "Print PDF" menu on the left.
